United States NY MTA Metrocard for Seniors Photo Size Requirements
| Passport picture size | Width: 1.5 inch, Height: 2 inch |
| Resolution (DPI) | 600 |
| Background color | White |
| Printable photo | Yes |
| Digital photo for online submission | Yes |
| Digital photo size | Width: 1000 pixels , Height: 1000 pixels |
| Photo Paper type | matte |
| Detailed requirements | MTA Reduced-Fare OMNY Photo Requirements for SeniorsIf you are applying for an MTA Reduced-Fare OMNY card by mail, you will need to include a recent passport-style photograph with your application. The required photo size is 1.5 inches wide by 2 inches tall. Your picture should show a clear, front-facing view of your face against a plain, solid background. The Reduced-Fare OMNY card is replacing the Senior Reduced-Fare MetroCard. Although many riders still refer to it as a Senior MetroCard, new applicants are generally issued an OMNY card after approval. You can use our photo tool to crop your image to the correct size and prepare it for printing. CREATE AN MTA REDUCED-FARE PHOTOMTA Reduced-Fare Photo Size and Specifications Your printed photograph should meet these basic requirements: Photo dimensions: 1.5 inches wide × 2 inches tall Metric dimensions: Approximately 38 mm wide × 51 mm tall Orientation: Portrait Photo style: Recent passport-style photograph Pose: Face the camera directly Background: Plain and solid Image quality: Clear, sharp, and evenly lit Name on photo: Write your full name on the back Required for: Applications submitted by mail Your face should be centered and easy to recognize. Avoid blurry images, heavy filters, strong shadows, distracting backgrounds, or edits that noticeably change your appearance. How to Apply for an MTA Reduced-Fare OMNY CardPeople aged 65 and older can apply for the MTA Reduced-Fare program. Applications may be submitted by mail or completed in person at an eligible MTA location. Applying by Mail To apply by mail:
Review the latest official application before mailing anything. Addresses, accepted documents, and application procedures may change. Applying in Person You can also apply at a participating MTA customer service location or mobile sales location. Applicants who apply in person may have their photo taken free of charge, so bringing a printed photograph may not be necessary. Before visiting, check the official MTA website for current locations, opening hours, identification requirements, and service availability. Who Can Apply for a Senior Reduced-Fare Card? The senior Reduced-Fare program is available to riders who are 65 years of age or older. You will need to provide an accepted form of identification or another document that confirms your age. Depending on the current application rules, accepted documents may include a driver’s license, state-issued identification card, passport, birth certificate, Medicare card, or similar official record. Refer to the latest MTA application for the complete list of accepted documents. Senior MetroCard or Reduced-Fare OMNY Card? The MTA is moving Reduced-Fare riders from MetroCard to OMNY. For that reason, the card may now be described as a Reduced-Fare OMNY card rather than a Senior MetroCard. The older name is still widely used, particularly by existing riders and people searching for application instructions. Whether you search for a Senior MetroCard photo or an OMNY Reduced-Fare photo, the application photograph serves the same basic purpose: identifying the approved cardholder. Frequently Asked QuestionsWhat size photo is required for an MTA Reduced-Fare application? The required printed photo measures 1.5 inches wide by 2 inches tall. This is approximately 38 mm wide by 51 mm tall. Does the photo need a white background? The background should be plain and solid. A white or light-colored wall is often the easiest option because it provides a clear contrast with your face and clothing. Can I use a regular passport photo? A standard United States passport photo measures 2 × 2 inches, which is wider than the MTA photo requirement. You may be able to use the same original image, but it should be cropped and printed at 1.5 × 2 inches for the MTA application. Can I take the picture with my phone? Yes. A phone photo is usually suitable as long as it is recent, clear, properly lit, and taken from directly in front of you. Can I smile? A natural expression or slight smile should be acceptable as long as your face remains clearly visible. Avoid exaggerated facial expressions. Are glasses allowed? Glasses can be worn if they do not create reflections or block your eyes. Check the image carefully before printing to make sure your facial features are easy to see. Can I wear a hat or head covering? Avoid hats and other coverings that hide part of your face. Religious or medical head coverings should leave your facial features visible. Should I write my name on the photo? Yes. For a mailed application, write your full name on the back of the printed photograph. Can I submit the photo online? At the time this information was reviewed, online Reduced-Fare applications were not available. Applications could be submitted by mail or completed in person. Because MTA services may change, check the official website before starting your application. Do I need to bring a photo when applying in person? The MTA offers free photography at participating in-person application locations. Confirm that this service is available at your chosen location before visiting. How long does approval take? Processing times depend on the application method and current demand. Applications sent by mail may take longer than applications completed in person. Check the latest MTA guidance for current processing estimates. How to Prepare Your MTA Photo with 123passportphoto.com passport size photo toolFollow these steps to create a photo for your mailed application:
Official Sources |
Why 123PassportPhoto?
- Save money: You don't need to pay so much for your passport photo. With 123PassportPhoto service, you can make your own passport photos and print it yourself.
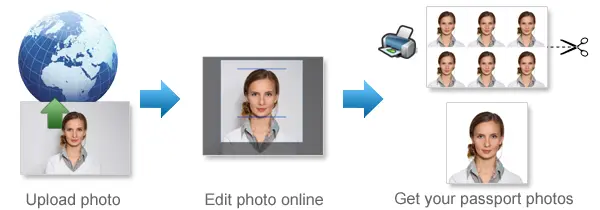
- Save time: Just take a photo using digital camera, then upload and create passport photo with 3 steps. It takes less than 5 minutes to be ready for download.
- White background enhancement: Our premium feature can help you to adjust the photo so that you can get a white background passport photo. Most countries prefer white background passport photos.
- Auto crop with face detection: Our system automatically detects your face and crops the photo to the correct passport size. You can still adjust the cropper manually to get the perfect result.
- Auto background removal: Automatically remove the background from your photo and replace it with the background color your document requires — white, blue or any other required color.
- Ultra high resolution photo: 123PassportPhoto generates passport photos suitable for 600 dpi printing.
- We support 50+ countries such as USA, UK, Ireland, Australia, Canada, France, Germany, Japan, South Africa, Brazil, China, Singapore, Russia, Hong Kong, Netherlands, Argentina and more.
General Passport Photo Requirements
- Neutral facial expression: a. do not open mouth; b. open eyes.
- No glasses; No Hat.
- Don't cover eyebrows with hair.
Find more information on requirements and photo taking tips here.
If you need to edit your photo, you can use our free photo editing tools.
How to Print Passport Photos Using Color Printer
- Download the 4R sheet with multiple photos.
- Check the requirements and use correct 4R photographic paper (matte, semi-matt or glossy paper).
- Print the 4R sheet with no margins. Make sure the 4R picture fit exactly on the 4R photo paper.
- Cut the 4R sheet along the gray lines and you will get multiple photos.
Steps to create passport photos
- Select country and ID photo type, and click Start.
- Upload photo. In order to correctly make passport photo, the picture size should be smaller than 10MB, and the dimensions should be smaller than 4000 x 3000 pixels. The system accepts only .JPG or .JPEG files. The Crop page opens when the photo is uploaded.
- Crop photo to the correct passport photo size dimension.
- If you need white background enhancement, select an enhancement.
- Click the Next button, you will get a printable passport picture which is suitable to be printed on 4R (4x6") photo paper.
- Save the 4R sheet and print it using a photo printer or print it at any photo center.
How to Take Baby Passport Photos
- Lay white or light color baby quilt or blanket in a bright room or other places with good lighting.
- Lay the baby on the quilt or blanket.
- Ensure baby is looking straight at the camera with eyes open, mouth closed and not smiling.
See more tips on taking baby passport photos here.
Passport Photo Size Requirements
- United States Passport Photos Size Requirements
- United Kingdom Passport Photsos Size Requirements
- Australia Passport Photos Size Requirements
Find passport photo requirements for more countries here.
Quick Links to Make Passport Photos
- Make US Passport Photos
- Make UK Passport Photos
- Make Australia Passport Photos
- Make EU Passport Photos
- Make Ireland Passport Photos
- Make Canada Passport Photos
- Make New Zealand Passport Photos
- Make China Passport Photos
- Make India Passport Photos
- Make Singapore Passport Photos
- US Passport Photos Near Me